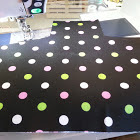
Hello! I know I haven't blogged anything since my finishes, but I haven't been feeling well. I have had a headache for three days that just won't quit. I guess I need to just deal with it and get up and sew. I may do that later today. I'm tired of sitting in my recliner all day with my head covered up. We changed allergy medicine because I told hubby I might need a change, but nope. Not a good idea. My head is giving me fits. I think it is sinus issues. So back to generic Claritin it will be. I wanted to share with you the handbag I made for my daughter for a late birthday/ Mother's Day gift. I have had a lot of compliments on Facebook on my purse, and it makes me feel good. :D I added photos to show you the process I went through, somewhat, while making it. So, here goes: I purchased the outside fabric from Hobby Lobby. It is by Brother and Sister Designers. I really like how it looks on this bag. The pattern for the purse is Margo Bag by Lazy Girl Designs. They have several different styles of handbags.
 |
| This is all pieces laid out to begin. The pattern is on the left. Lazy Girl Designs: Margo Bag |
Beside the pattern to the right, you see my outside and inside of pocket fabrics I will use. To the right of that is the fabric I used for the pockets. The lining is the black with white version of the pocket fabric.
 |
| This is the outside pocket for the handbag |
To make this part of the bag, the pattern included a template drawing for the cut out for the pocket. (The area where it comes down from the top to the sides of the pocket piece).
 |
| This is the inside pocket lining for the bag. As you can see, the outside pocket fabric is underneath here. I sewed the two pieces together and then top-stitched along the top of the pocket area. |
 |
| This is the back of the handbag. |
 |
| This is the strap. It called for batting and interfacing. I used Pellon interfacing and some fleece type material for the batting. I folded over 1/2 in. of the fabric over, then pressed the fusible interfacing to the batting and folder over until I have approximately 1/2" left and then folded under the fabric to hide the raw edge and pressed. |
 |
| The Strap when top stitching on each side then in the middle to secure. Note: I made the strap 30" instead of the called for 25" in the pattern. I know my daughter and I both like longer straps. |
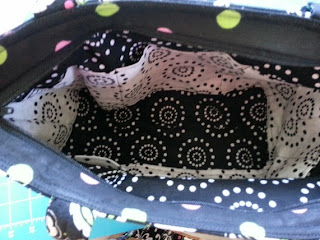 |
| Inside of finished bag The pockets are on both sides of the purse and totals about ten pockets. |
 |
Zipper area of the finished purse.
|
 |
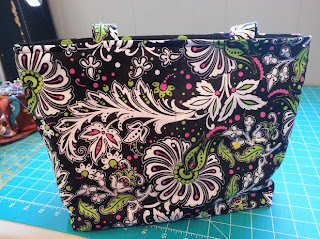
Finished purse on the front.
|
 |
Back of handbag.
I love this fabric! What about you? I am very pleased with how it turned out.
I have to be honest. I usually have so much trouble putting in zippers in handbags. This one is the easiest I have ever put in. I will definitely make this purse again. I need to make myself one. LOL I know she will enjoy this one. Thank you for sharing this time with me.
NOTE: No payment was received by me for this post or giving credit to Lazy Girl Designs. I purchased the pattern and made the bag myself. I changed the length of the straps for my daughter without input from Lazy Girl Designs.
Have a blessed day!
Teresa
|


Your bag is gorgeous! Loving the fabric! I wish I could make bags like this...
ReplyDeleteThank you, Wendy! It is the first one I've made like this. If I can do it, you can, too!
DeleteYour bag looks great. Love the pattern. The zip looks good.
ReplyDeletelooking good! Lazy Girl has some excellent pattern for purses. I used to have a Towne purse that I loved----till the zipper went out, that is. Mom tried to help me replace it but it would have been easier just to have made a new one. Maybe in my free time, LOL. That's a joke!
ReplyDeleteDarned headache. If it is sinuses you are probably in good company round here.
Sew sew pretty. I am sure Jen will love it......
ReplyDelete